- Identify an installation locaiton
Locate the cold water 12mm pipe under the sink also making sure there are no other obstructions under the sink where the tap will be installed. Identify a good location for your filter. - Install your sink tap (If you are adding a new one)
Install the tap in a flat section of the sink or in the bench top near the sink
Use a nail or centre punch to mark the centre of hole where the tap will be installed.
Use a battery drill to make the tap hole. If drilling through Stainless Steel, drill at a slow speed while adding a few drops of water as you go.
Start with a small drill – 5mm or so, and work your way up using about 4 different drill bits until 12mm.
Fit the sink tap, putting the big hard washer & nut under the sink.
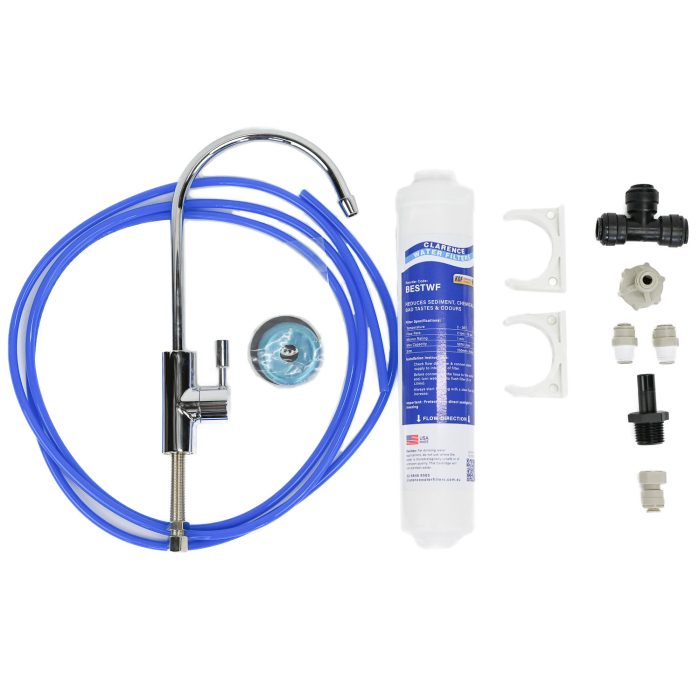
The kit includes a John Guest quick connect tap adaptor which screws onto the bottom of the tap to connect the ¼” tubing. - Cut into your 12mm line and add fittings
NOTE: To use the quick connect fittings simply push the tubing all the way into the fitting and then pull out to lock and seal. Do not kink or have tight bends in the tubing near the connections.
Use a sharp knife to cut the tubing straight across without deforming the tubing. You will need to have a straight cut for the tubing to seal.
Fit the 12mm John Guest tee into the cold water line.
Push the 12mm Stem to 1/2″ Male fitting into the Tee inlet which will be feeding into your filter system Reconnect the 12mm lines to the other two Tee inlets.
Screw the 1/2″ Female to 1/4″ Tube fitting onto the male thread of the stem to 1/2″ Male fitting.
Refer to the image at the very bottom of this page to see the correct connection order. - Place your BESTWF Filter
Find a suitable location and screw the C shape filter mounting clips in the cupboard.
Make the location easy to access for filter replacement. It is also a good idea to leave the tubing longer to allow the filter to be un clipped and brought out of the cupboard for servicing. - Add tubing
Run the ¼” tubing from the cold water supply tee to the inlet on the filter system.
Fit the tube from the new sink filter tap to the outlet side of filter. - Check all connections.
Turn on the filter tap and leave it on to allow the air and carbon fines to purge out of the system.
Turn on the water supply and flush the new filter for 2-3 minutes.
Turn off sink tap and check for leaks.
You may have some air bubbles in the water for a few days, this will go away.
If the filter system is not in uses for more than a week flush before using.
It is important when installing a new filter cartridge to always make sure the filter tap is turned on before turning the water supply on. This will allow air to escape and flush out carbon fines which may cause the water to look cloudy. Flush until water is clear or has minimal air bubbles.
Replacement Filters and Parts available from Clarence Water Filters
Filter: BestWF
CLARENCE WATER FILTERS
W: www.clarencewaterfilters.com.au
T: 02 6646 8565
E: sales@clarencewaterfilters.com.au
